Friday, January 26, 2007

Wonders Of Creation


“For since the creation of the world God’s invisible qualities-his eternal power and divine nature-have been clearly seen , being understood from what has been made, so that men are without excuse.” Romans 1:20

When ever I look at the beauty of creation something about it speaks to my heart deep within me. It draws me to the one who created it. I stand in awe. A living picture made just for us, by a loving and awesome Father.

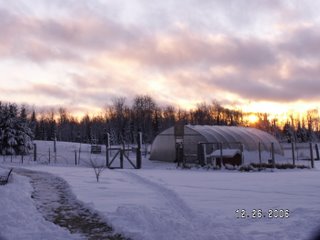
We are blessed to see beautiful sunsets like these on a regular basis and all through out the year no matter what the season. These happen to be winter sunsets taken just recently. Who ever spots them first comes running to tell everyone else, “hey you guys, you have to come out here and check this out”. Soon we are all gathered around oohing and aahing over the sight of such magnificent splendor.

God speaks to us by the things he has made. Moments like this are a gift to behold just for His children. The beauty of creation was not for the animals, but rather, just for us. Not once have I ever seen the sheep or the poultry standing mesmerized, staring into the wonders of the sky. It doesn’t even occur to them to look up. But, for us, it is almost irresistible. Proof enough for me that God is there, He has a plan and He isn’t finished yet.

Wednesday, January 24, 2007

NAIS News

Idaho couple mistakenly registered their premises with NAIS, told that "it was impossible to remove a premises once it was registered."

"Even if the ranch or farm is sold to a developer and the land is converted to hotels and apartment buildings, the land still carries the premises identification number assigned by the NAIS."


Click on link below for entire story.

http://worldnetdaily.com/news/article.asp?ARTICLE_ID=53913


Apparently the grass roots effort opposing the National Animal Identification System is having an effect.

"Affected landowners and small farmers raised such a ruckus, that the USDA had to back down and promise that the NAIS would be voluntary.
Organizations such as the
Liberty Ark Coalition, nonais.org, stopanimalid.org and dozens of Internet groups have sprung up across the country in opposition the NAIS and to similar programs being developed at the state level using funds provided by the USDA."
Click on link below for this story.


http://worldnetdaily.com/news/article.asp?ARTICLE_ID=53746

On The Home Front

Recently we got a letter from the USDA complete with a neat aerial color photo of our property.

The letter began,
" We appreciate the opportunity to serve you at our office. To improve our services, we are writing to ask for your help in reviewing maps of your farm(s).

Our office has been working on converting paper maps to digital using computer mapping software. We believe the new maps will provide our customers higher quality maps and more accurate measurements. The new maps will also be more up to date than before because we used 2005 aerial photography. In the future, computer mapping will allow you to report crops and complete other FSA business on the Internet.

Please review the enclosed map for accuracy. If you identify fields that appear to be incorrectly placed on the map, please let the county FSA office know within 30 days of this letter so that we may make appropriate corrections.

If we do not hear from you within 30 days from the date of this letter, we will consider the field boundary information correct and use this acreage for USDA/FSA program purposes such as the Conservation Reserve Program (CRP) and Direct and CounterCyclical Program (DCP). "

On the map they enclosed, they had our supposed property boundaries highlighted in yellow. It's close but I noticed some possible discrepancies.

Now, we have never participated in any kind of USDA farm program, don't ever plan to and I don't believe any previous owner ever has in the history of our property. So it gives a person a kind of eerie feeling knowing that Big Brother is photographing and "mapping' our land in such minute detail. Better make sure a guy is standing "under" a tree next time he relieves himself out of doors. Never know if it'll wind up on the Internet or something.

I kind of want to go down to the local USDA office and see what this is all about, but then again I'm afraid I'll get rooked into signing on with that blasted totalitarian NAIS. If I do nothing are they going to cement our boundaries in stone and if they do will that somehow effect us in a negative way in the future? By looking at the map it looks they cheated us out of some acreage of land. The whole thing bugs me! Don't really know how to respond to it.

I kind of have a bad feeling about it as far as staying off the radar screen of the dreaded National Animal Identifcation System.


When I think of how our wonderful state leaders are taking such good care of us it makes me feel all warm and fuzzy inside.

Until Next Time

Monday, January 22, 2007

Some Up Dates On Our Links List

Just wanted to make a mention of some additions to the links list on the right side bar here.

We added John Mesko's
Lighthouse Farm website where he and his family advertise their farm. But, it is far more than just a website it is a valuable resource as well for anyone interested in the benefits of real food and the philosophy behind it. Check out their pod casts and Agrarian articles.

Also, John Mesko( Good Farmer John) is now writing over at Northern Farmer where he recently made a thoughtful post entitled Authentic Agriculture: Defined. He address' the issue of how words like "organic" and "natural" have gotten hijacked by the corporate giants and the USDA. John explores the idea of coming up with a new "word" which would not be so easy to be taken over. John says," I say let’s coin our own word, define it first, and lay claim to it before anyone else does. I put forth “Authentic Agriculture.” Authentic means “made or done in the original, traditional way, or in a way that faithfully resembles an original.”


We know quite a few of home schooling families as well as being a home schooling family ourselves. Some of the kids we know including two of our own have gone on to graduate and have now begun to live out their adult lives. Most folks we know have even less confidence in the higher educational institutions than in the public school system and often discuss "what next" for our kids who want to pursue further learning. Well, now there is what appears to be a fine alternative through the Biblical Concourse of Home Universities listed as Home Schooling Through College over on the right side bar. I highly recommend checking it out for those of you who are serious about your child’s continuing education.

Most folks who frequent the agrarian blogs are quite familiar with Tom Scepaniak’s writings over at Northern Farmer. He has another blog called Healing Waters which has more of a spiritual focus. It's still written in his same enjoyable down to earth style but with a bigger emphasis on Faith. "Simple country faith from a simple country farm family" .
I for one always enjoy Toms perspective on spiritual matters and this blog is definitely one to go to for that.

And last but certainly not least. I had lost track of PJ (Pastor Josh)when he changed his blog address and I recently found him again, so you will see his updated link which will take you to his 'In God We Trust' blog site. I always enjoy his perspective on spiritual matters as well.

Also we changed our email address after getting high speed internet, which you can see if you click on the "Email Me Here" link under the photo of our log cabin.

Guess that's about it as far as updates go.

Until Next Time


Tuesday, January 16, 2007

Slip Form Project


Above is a rough sketch of what our project is supposed to look like when we are done.

Over the years I often heard of an alternative way to build stone walls, called the “slip form” method. The authors who wrote about it usually gave a brief description of the process but, for me there was always something lacking and I only came away with a vague notion of how to build that way. It wasn’t until I watched a video called
The Art Of Slip From Stone Masonry that I was finally able to fully grasp the concept.

I think first of all, I would say after actually having practiced the method, the term “slip form” can be a little deceptive. The forms must be “put together” making sure they’re all secured and plumbed and leveled then you make the pour. Once it is sufficiently cured you remove the forms do the clean up on the exposed stones and then “rebuild” the forms higher up on the wall. I don’t believe I would have ever said it was something that you “slip”. Perhaps there are methods which are more like slipping but, how we are doing it, it’s building or putting together, taking apart and then rebuilding up higher as you go.


Kelli and I hope to some day build our “dream” home and I have been entertaining the thoughts of building a slip form basement. So I was anxious to try it out on a lesser project to see if that’s what I wanted to do.

On our property we have a swampy slough that is fed by springs and the water trickles out through a narrow place onto the second 40 and out into a large cedar, spruce and tamarack swamp. We are told by folks that there used to be a dam across the narrow and there was a beautiful trout pond. Apparently the previous owner dynamited out the dam in order to drain the pond so that he could do some excavating enlarging the pond.

One day while my Dad and I were discussing how we were going to restore the old dam we decided that it would be a good project to try out slip forms. We would build stone and mortar retaining walls on either side of the dam making a bridge which we could actually drive across.


We began by shoveling out trenches about 30’ long for the first footing pours. The first couple pours were of solid concrete reinforced with rebar. We mixed the concrete by hand in a wheel barrel. Actually my Dad mixed and I poured using 5 gallon buckets. It was a lot of hard work mixing by hand and lugging 5 gallon pails.


So we picked up a used cement mixer and then used the wheel barrel to cart the cement. That eased up the work load considerably.

My Dad had acquired a large 12 inch iron valve just for the purpose of restoring the dam. That way if we ever wanted to drain the pond all we would have to do is open the valve.

After the first footing pours were done, we set in a 20’, 12’’ diameter plastic pipe. Up to that point we just used scrap pieces of wood to make the forms. We drove stakes into the ground which we nailed the form boards to just like you would for pouring a sidewalk or slab. We used double headed nails for ease of dismantling
later.

After the pipe was in we built better forms, ones we have used over and over. We have 6 segments 8’ long by just under 16’’ high. What we did was take a 4x8 sheet of plywood and cut it into 3rds. So I say just under 16 inches from what was removed by the saw blade in two cuts. The plywood segments have 2x4 reinforcing on the out side so that the wood does not warp.We coated the forms with oil to keep them from sticking to the concrete.
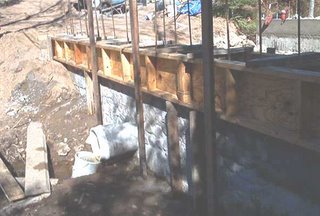

The new forms were placed end to end making the finished walls 24 feet long. The above photo shows the forms, how they are butted together and propped up with stakes. The previous lift is sandwiched at the base of the form and sticks are inserted to keep the top at the proper width. The sticks are 15 inches making the actual wall 15 inches thick. The two sides are pulled tightly together with twisted wire. We also nailed stakes across the top of the forms just to help keep everything square. Once everything is all together it’s pretty easy to tap and bump things getting it all plumbed and leveled. We are able to completely fill the entire 24 foot long form in about a day. We use vertical and horizontal reinforcing bars for strength. They’re a little tricky to work around but well worth the added reinforcement.


The beauty of building this way is that you don’t have to be a great stone mason to make nice looking walls. Charles McRaven has a couple excellent books about building with stone and he makes the point that you should begin by learning to make dry stack walls first before you build with mortar. The idea is to build in such a way that the wall would stand even without mortar. Then when you advance to using mortar you will then have extremely strong construction that will last for a very long time. The thing is you need reasonably flat stones to be able to build that way. In our area we have roundish ones. Some are as round as softballs. It takes great skill to build good strong walls with our kind of rocks.


In reality our slip form walls are actually concrete walls with a rock face on all the exposed areas. The strength is in the concrete and rebar. The object is to find rocks with a flat surface even one reasonably flat spot will work. We begin by adding some concrete and then sliding in a rock against the outside of the form. I try to find rocks that look like they would fit the voids between other rocks. Sometimes it takes a bit of doing to find the right shaped rocks. Usually my Dad can mix the cement faster than I can place rocks. Especially once we got to the top pours were we have rocks showing on all four sides. We also use stones to fill in, in the middle to help reduce the amount of concrete used. The biggest cost is in the Portland cement. We have our own sand pit so the sand is free. So are the rocks, by the way, since they’re all over the place here. The good thing about these round rocks is that the rounded edges actually lock in place real nice once the concrete is set.

Once the pour is done we leave it alone till the next day. When we remove the forms some of the concrete has seeped around the stones so all of that has to be chipped and brushed away. We use masonry chipping hammers and wire brushes for that. Its quite enjoyable doing the clean up seeing the finished product emerge from under the cement.

In the below picture you can see a fresh pour right after it’s been cleaned up. This particular picture is of the water side before the valve was installed. We made a little mud dam and ran a smaller pipe through it to help dry up our work area on that side.
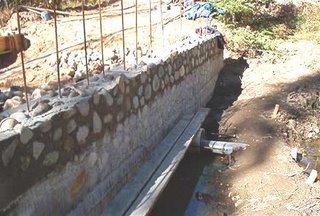


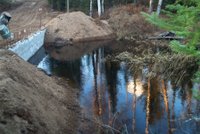
After we stopped working on the dam for the season out of curiosity we closed the valve to see how much water would build up. In the pictures below you can see the top of the valve peeking out next to the wall. At that point the water was about 3 ½ feet from the bottom of the pipe. The deepest water was about 5 feet deep. Later after the spring run off, the water got within about 6 inches of the top of the wall. At that point I estimate that the water was at around 8 feet at it’s deepest point.



We picked it up again in 06 and almost got the wall on the water side finished. We only have one pour left on that side. As we progressed our plan evolved a bit. In the sketch at the top of this post you can see our original thought on where we were going to place a pair of spill way pipes. We have since changed our minds and are going to put a spill way in the bank and not have it built into the wall. And we plan to pour a solid concrete cap for the last pour. It will be about 6 inches high with an inch or so hang over all the way around as a drip edge.

In the above pictures we are making our last pour of the season. This is were we made the arch like in the sketch. The cap will be the last pour on that side.

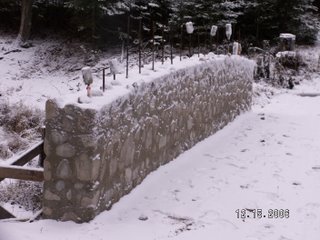
In the pictures below you can see the final curved shape of the top and of course without the cap. This is where we stand with our project right now. The rebar that is currently sticking up will be bent over and poured right in to the cap.

It’s been quite an under taking and a real learning experience. Once we get the walls completed then the big project will start, of cutting out all the brush and tree’s that have grown up over the years and of trenching out the pond.


Until Next Time

Sunday, January 07, 2007

Some More Video From 2006

This first video is of a pair of Sandhill Cranes that hung around our place all summer last year. For 3 or 4 summers in row cranes have foraged in our fields.


Last year unbeknownst to us this hen (in the video below) hatched out 5 chicks. We had no idea she was even setting on a nest. She had it hidden some place. It was fun to watch the chicks slip through the chain link fenced used to close in the poultry yard. They’d make daring little excursions on the outside, gobbling up all kinds of succulent morsels not found in the main yard.

Numerous times we’d hear the distress call of one of the little chicks as they would be too much of a temptation for our barn cats. We always seemed to rescue them just in the nick of time usually just by running up and hollering, the cats would quickly turn it lose and scamper away. All 5 chicks survived the summer and have now taken their place as a next batch of laying hens. Much to the credit of the momma hen. She was an excellent mother and very protective as you can see at the very beginning of the clip.

At the end of the video you can see 3 of our geese. The gander earned our kids first place at the county fair in 1999.


Did you notice the Sandhill Cranes making their calls in the background?


In this last video below you will see the chicks as they begin their adventures outside the fence. As they grew older they would venture farther and farther out. They learned to be on constant alert of the cats and would high tail it back to the safety of their mother at the slightest hint of danger. We had loads of enjoyment watching their antics last summer. Especially as they were getting bigger and had a harder time squeezing their little bodies through the fence. Sometimes we had to go help them when they’d get stuck.


Until Next Time

Wednesday, January 03, 2007

No More Dial-Up!

Well, we finally did it. We got high speed internet. And it sure is making our lives easier as far as getting around here in cyber space. Our time is spent far more productively. Instead of sitting there waiting and waiting for things to load it's pretty much there with the click of the mouse. I've been getting around to more of the agrarian blogs now because it doesn't take forever to just get a page to come up. This is the way it should work!

Earlier in 2006 when our bees where getting established I took some video of Dan's hive with our daughters new camera to show him how things were progressing. Now that we have high speed I thought I'd try and figure out how to post the video to this blog.

Well, here it is below. It's pretty rough and it was originally intended just for Dan to see but, this is just an experiment so here it goes.

Let me know if it works for you. Thanks!


Until Next Time